相信大家很多人在做带单色点阵屏幕的单片机项目时,如果需要用到渲染中文字体的情况,有时候会选择使用电脑程序取字模的方法,生成一个数组放进项目文件里面作为字体使用。然而这种方法有几个缺点:
- 没有压缩
- 如果字形很多,则生成字体很麻烦
- 只能用自己的字体,很多别人已有的点阵字体都不能用
如果单片机的 FLASH 空间紧张,但又想显示较多种类的字形,这时可以借用 u8g2 的字体(不使用 u8g2 库,只使用它的字体),有以下优势:
- 位图数据用游程编码算法压缩,占用 FLASH 小很多
- 字体种类繁多,中文已有开源的 文泉驿 ↗ 字体可供使用
- 可以通过很多已有工具快速生成字体,无需额外配置
本文参考 u8g2 库的代码、议题和维基,详细解析 u8g2 字体数据,并使用 C++ 将文泉驿中文字体显示到控制台上。
解析#
在开始之前建议先简略看看 U8g2 Font Format ↗ 以便对字体的结构有一个大概的了解。
字体头#
u8g2 字体头由 23 个字节组成,存在于每一个 u8g2 字体中,用于提供基本的字体信息。
字体头的释义可以在 wiki 或者 代码 ↗ 中找到,下表详细解析每个组成的具体意义:
| 偏移 | 大小(字节) | 内容 |
|---|---|---|
| 0 | 1 | (Unicode <= 255 的)字形数量 |
| 1 | 1 | 边界框模式(解码时不相关) |
| 2 | 1 | 0 位游程编码数量的位宽() |
| 3 | 1 | 1 位游程编码数量的位宽() |
| 4 | 1 | 指示字形宽度像素数的位宽(bitcntW) |
| 5 | 1 | 指示字形高度像素数的位宽(bitcntH) |
| 6 | 1 | 指示字形 x 轴偏移像素数的位宽(bitcntX) |
| 7 | 1 | 指示字形 y 轴偏移像素数的位宽(bitcntY) |
| 8 | 1 | 字形间距(到下一个字形的增量)值的位宽(bitcntD) |
| 9 | 1 | 字形边界框宽度 |
| 10 | 1 | 字形边界框高度 |
| 11 | 1 | 字形边界框 x 轴偏移量 |
| 12 | 1 | 字形边界框 y 轴偏移量 |
| 13 | 1 | 字母 A 的升部(基线以上大小) |
| 14 | 1 | 字母 g 的降部(基线以下大小) |
| 15 | 1 | 括号的升部 |
| 16 | 1 | 括号的降部 |
| 17+18 | 2 | 字形 A 的偏移量(大端序) |
| 19+20 | 2 | 字形 a 的偏移量(大端序) |
| 21+22 | 2 | 字形 0x0100 的偏移量(大端序) |
下面是部分内容的详细说明:
边界框模式 Bounding Box Mode#
边界框模式有 4 种类型,以 0 ~ 3 表示,分别是:
0proportional: 宽度和高度都不固定1common height: 高度相同,宽度可能不同2monospace: 固定宽度3multiple of 8: 8 的整数倍
边界框模式用于指示将多个字形编排成一个单词或者一句话时,应该如何对齐,所以它与单个字形的解码并不相关。
u8g2_font.c 中的注释提到了这个模式的作用:
Font build mode, 0: proportional, 1: common height, 2: monospace, 3: multiple of 8
Font build mode 0:
- “t”
- Ref height mode: U8G2_FONT_HEIGHT_MODE_TEXT, U8G2_FONT_HEIGHT_MODE_XTEXT or U8G2_FONT_HEIGHT_MODE_ALL
- use in transparent mode only (does not look good in solid mode)
- most compact format
- different font heights possible
Font build mode 1:
- “h”
- Ref height mode: U8G2_FONT_HEIGHT_MODE_ALL
- transparent or solid mode
- The height of the glyphs depend on the largest glyph in the font. This means font height depends on postfix “r”, “f” and “n”.
简单来说就是 mode 0 是最紧凑的模式,每个字形的高度都是可变的(一般是每个字形适合自己的最小值),而 mode 1 指示字体中所有字形的高度都是统一的(一般是所所有字体高度中取最大值)。
游程编码数量的位宽 和 #
u8g2 的字体使用游程编码(RLE)算法来压缩字体的数据,其中“0/1 位游程编码数量”指的是“0”或“1”有多少个,而“位宽”指的是这个数量要使用多少位来表示。这个位宽将会在解析字形数据时用到。
在游程编码中,数据通常以连续相同的位(0 或 1)序列的长度进行压缩表示,比如:
000110000可以表示为:3 个重复的0,2 个重复的1和 4 个重复的0
其中:
- 3(
0b11) 和 4(0b100) 就是0位游程编码的数量 - 2(
0b10) 是1位游程编码的数量 0位游程编码的位宽是 3(取决于这个例子的最大值 4 占用的位宽)1位游程编码的位宽是 2(取决于这个例子的最大值 2 占用的位宽)
游程编码数量的位宽决定了游程编码数量的最大值。
那为什么需要指定游程编码的位宽,而不是每个数量都占用固定值,或者更方便计算的 1 字节呢?主要还是因为字体数据的设计考虑到了单片机本来就小的 FLASH:
- 游程编码数量位宽固定为 8 位,不符合字体数据实际情况,如果字体数据的熵较高,则不会起到压缩的效果,反而还会增大数据的体积。实际上是几乎没有字体的数据会有上百个连续的 0 或 1 的,对于点阵字体,一般都是几个到十几个连续的相同数据
- u8g2 字体种类繁多,每种字体都有最适合自己的游程编码数量的位宽,如果固定位宽,则有些字体并不能达到最佳的压缩效果
字形宽/高度像素数的位宽#
指示字形宽度或者高度值所占用的位宽是多少,这个位宽将会在解析字形数据时用到。
字形 x/y 轴偏移像素数的位宽#
指示字形 x 轴或者 y 轴偏移值所占用的位宽是多少,这个位宽将会在解析字形数据时用到。
字形间距值的位宽#
字形间距影响当前字形到下一个字形的增量,是指当前字形 x 轴的起始部分,到下一个字形 x 轴的起始部分的距离。字形间距用于渲染一段文本时,指示两个字形之间的间隔。一般来说,16 像素宽度的中文,一个中文的字形间距可能就是 16,字形间距值的位宽是 5 位。在不同的字形数据里面,字形间距值也会不同,在 16 像素宽度的中文字体里面,标点符号的字形间距值可能就是 1 ~ 3。
字形边界框的宽高和 x/y 轴增量和基线#
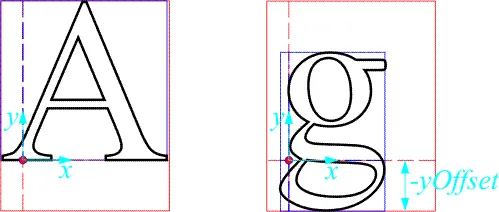
- 字形边界框包含完整的一个字形信息,上图中蓝色框为字形边界框,宽高就是蓝色框的宽高
- 字体边界框需要括住 x/y 偏移后的字形边界,上图中红色框为字体边界框
- 字形的 x 轴和 y 轴增量根据图上的两个轴增加,可以看到因为 y 轴是向上的,“g”字符 y 轴偏移量为负数
- 拉丁字母按照基线排列,有的(例如 A)字母在基线之上,有的(例如 g)字母延伸到了基线下面,超过基线的叫做升部,低于基线的叫做降部,上图中红色水平虚线就是基线
字形偏移量#
字体头提供了重要字形在字体数组中的偏移量,一边快速找到对应的字形。例如要快速找到“x”的字形数据起始位置,可以这样:auto lower_x_glyph = font_start + lower_a_offset - 'a' + 'x';
整体的字形数据#
编码低于 0x100 的字形#
在字体头文件的 23 个字节之后,就是字形数据了。编码低于 0x100 的字形数据,字形开始都由自己的 1 字节编码和 1 字节的到下一个字形的偏移组成,随后就是它本身的字形数据。
以下使用 A 和 B 的字形举例,假设 A 字形数据占据 n - 2 个字节,B字形数据占据 x - n - 2 个字节:
| 0 | 1 | 2 ~ n | n + 1 | n + 2 | (n + 2) ~ x |
|---|---|---|---|---|---|
A | (n - 2) | A 的字形数据 | B | (x - n - 2) | B 的字形数据 |
编码大于或等于 0x100 的字形及 Unicode 跳转表#
在 2.23 版本及以后的 U8g2 里,引入了 Unicode 字形跳转表/查找表功能(#596 ↗, #595 ↗),使用跳转表可以加速大于 0x100 的字形数据的查找。
由于跳转表功能更新不兼容以前的版本,所以不仅要手动判断字体有无加入查找表数据,还要分别字体头数据里面,最后的一个十六位数据“字形 0x0100 的偏移量”到底指向的是查找表还是真正的 0x100 字形位置。
| 版本 | “字形 0x0100 的偏移量”指向位置 |
|---|---|
| < 2.23 | 真实的 0x0100 字形数据的偏移量 |
| >= 2.23 | Unicode 字形跳转表 |
跳转表的数据结构如下:
| offset (2 bytes) | unicode (2 bytes) |
|---|---|
| offset to the start of the glyph table | last unicode stored in the first block |
| size of the 1st block/offset to 2nd block | last unicode stored in the 2nd block |
| size of the 2nd block/offset to 3rd block | last unicode stored in the 3nd block |
| … | … |
| offset to the end of the gylph table | 0xffff |
通过以下代码可利用跳转表以快速查找字形:
unicode_lookup_table = font; // font 指向的是跳转表起始位置
do
{
    font += u8g2_font_get_word(unicode_lookup_table, 0);
    e = u8g2_font_get_word(unicode_lookup_table, 2);
    unicode_lookup_table+=4;
} while( e < encoding ); // encoding 是要查找的字形遗憾的是,U8g2 的文泉驿字体 ↗发布于查找表功能发布之前,并且再也没有更新过,所以是不支持跳转表功能的。
在跳转表之后(如果有)就是 0x100 字形数据的开始,每个大于 0x100 编码的字形数据都由自己的 2 字节编码和 1 字节的到下一个字形的偏移组成,随后就是它本身的字形数据。与上面的低于 0x100 编码的字形数据相比,只是开始的数据“自己的编码”由 1 字节变为了 2 字节,其它的没有区别。
字形数据详解#
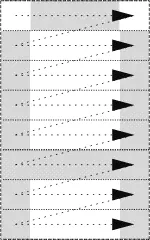
看上面的图片,字形数据实际上是由黑或白组成的一维的位图数据,从左到右,从上到下按行去排列成一个字形。假设图片上面白色是 0,灰色是 1。那么图形的数据就是:
0 1 1 1 0
1 0 0 0 1
1 0 0 0 1
1 0 0 0 1
1 0 0 0 1
1 1 1 1 1
1 0 0 0 1
1 0 0 0 1
宽高是 5x8
一共 40 位实际上是这么储存的(就是把上面的换行删掉):
0 1 1 1 0 1 0 0 0 1 1 0 0 0 1 ...当然直接这么储存字形数据是最浪费空间的存储方法,很多取模软件就是取出来这样子的数据,然后单片机按原样去渲染。这种方法的好处就是简单符合直觉,速度快,但是需要占用大量的空间,在 FLASH 超小的单片机上划出一大片空间来存储这些未经压缩的字形数据是不现实的。u8g2 的字体数据使用了游程编码算法来压缩字形数据,我们就以上图的字形数据为例,来看看如何压缩。
u8g2 的每个字形数据由以下部分组成:
| 长度 | 内容 |
|---|---|
| 1/2 字节 | 当前的字形编码 |
| 1 字节 | 到下一个字形的偏移 |
| bitcntW 位 | 字形宽度 |
| bitcntH 位 | 字形高度 |
| bitcntX 位 | 字形 x 轴偏移 |
| bitcntY 位 | 字形 y 轴偏移 |
| bitcntD 位 | 字形间距 |
| n 位 | 游程编码的字形数据 |
请注意区分内容的长度和内容的值。
其中 bitcntW, bitcntH, bitcntX, bitcntY, bitcntD 的值由字体头确定,也就是说除了字形数据之外,其它组成部分“字形头”的长度其实是固定的。当前字形编码的长度,如果字形小于 0x100,则是 1 字节,否则是 2 字节。
为什么字形宽高和偏移不固定?
为什么字形宽高和偏移不是固定的 1 字节或 4 位或 2 字节或其它?
不同字体宽高跨度很大,如果固定它们数据的长度,必须设置得足够大才可以兼容所有字体,但是这样的话对于小字体来说,根本不需要使用这么大的数据结构来存放它们,每个字形都会浪费一定的空间,所有字形浪费的空间加起来就会变得很大。所以必须在字体头中指定这些数据的长度,方便不同的字体去定义最适合(字形体积最小)自己的数据结构。
在这个“A”字形数据的例子里面,最适合的宽高偏移数据的长度是:
- bitcntW = 3 - 宽度是 5 个像素,用 3 位即可表示
- bitcntH = 4 - 高度是 8 个像素,用 4 位即可表示
- bitcntX = 0 - 忽略
- bitcntY = 0 - 忽略
- bitcntD = 0 - 假设字形间距是 0
那么此“A”字形的结构就可以先确定了起始部分:
| 长度 | 意义 | 值 |
|---|---|---|
| 1 字节 | 当前的字形编码 | 'A' |
| 1 字节 | 到下一个字形的偏移 | 待计算 |
| 3 位 | 字形宽度 | 5 |
| 4 位 | 字形高度 | 8 |
| 0 位 | 字形 x 轴偏移 | 0 |
| 0 位 | 字形 y 轴偏移 | 0 |
| 0 位 | 字形间距 | 0 |
| n 位 | 游程编码的字形数据 | 待计算 |
除了游程编码的字形数据外其它数据的长度一共是 23 位。
以上就是“字形头”部分,剩下 n 位字形数据就是游程编码后的数据,需要用到 和 ,这两个数据的含义在上面就有介绍了,实际上 的值就是有多少个 0 的数据的位宽,而 的值就是有多少个 1 的数据的位宽。在这个例子中,最适合的 和 的值是:
- - 最多有 3 个连续的 0,可以用 2 位表示
- - 最多有 7 个连续的 1,可以用 3 位表示 (但是实际上编码的话会发现这 7 个 1 被分成了 2 个 1 和 5 个 1,实际上是基于 5 个 1,用 3 位表示)
游程编码部分,u8g2 是这样做的:
- 0 的数量,不可以超过
- 1 的数量,不可以超过
- 接着是上面两个多少个 0 和多少个 1 的重复次数,重复 n 此就用 n 个
0b1来表示 0b0用于表示当前段的结束- 重复上面的步骤,直到这个字形的所有像素都填满
从左到右,从上到下。先数有几个连续的 0,再数有几个连续的 1,然后看这个组合能不能被重复,如果可以重复,记下来要重 n 次,用 n 个 0b1 来表示,然后再继续下一个组合。
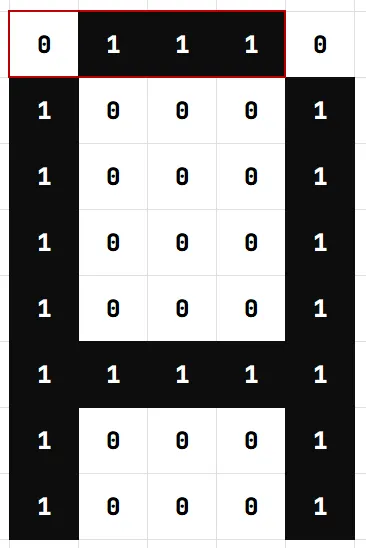
在这个例子中,第一步先数 0 和 1 的数量,看上图红色框住的部分,可以数到有 1 个 0 和 3 个 1,并且往后没有可重复的部分(因为后面是 1 个 0 和 1 个 1),所以这一部分的数据就是:0b010110
| 0 的数量( 位) | 1 的数量( 位) | 重复次数 | 结束标志 |
|---|---|---|---|
01 | 011 | 无 | 0 |
接着数:
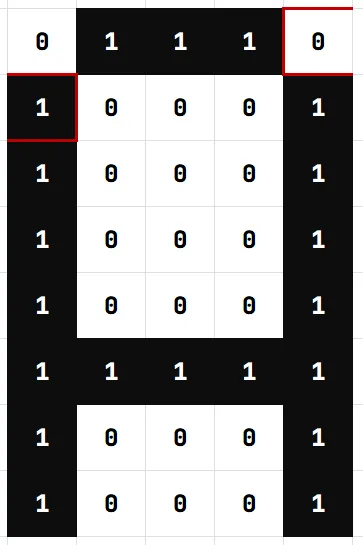
这一部分可以数到有 1 个 0 和 1 个 1,也是不能重复的,所以这一部分的数据就是:0b010010
重复的部分要来了:
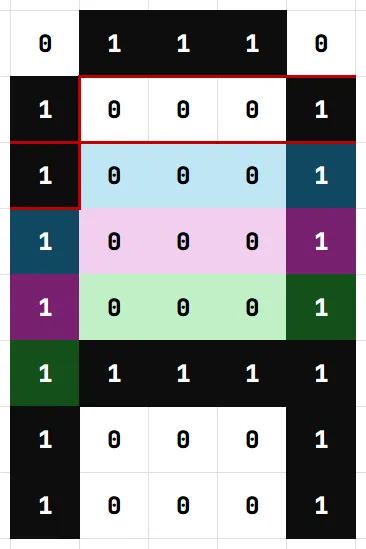
这一部分可以数到有 3 个 0 和 2 个 1,图中蓝色、紫色、绿色部分都是可以重复的,就是可以重复三次,那么这一部分的数据是:0b110101110,20 位的数据被压缩成了 9 位。
| 0 的数量( 位) | 1 的数量( 位) | 重复次数(3 次) | 结束标志 |
|---|---|---|---|
11 | 010 | 111 | 0 |
接下来的 3 步数据都是不能重复的,分别是:
0b0010100b1101000b110010
下面的内容就是最后的游程编码字形数据,可以尝试根据数据,再解读出来字体,验证一下对不对:
010110 010010 110101110 001010 110100 110010一共 39 位,只压缩了 1 位,还没算上“字形头” 😱。
主要原因,还是因为这个字形太小了,游程编码的优势在于连续的 0 或 1,而这个字形的 0 和 1 的连续性太少,所以压缩效果不明显。在很多 u8g2 的大字体里面,游程编码实际上的压缩效率是非常高的,因为在大字体里通常都会有很多的留白或很粗的线条,只记录字形的原始数据的话,会很浪费空间。
那么就继续,将这个字形数据完善吧,现在只剩下到下一个字形的偏移的值还没有计算,起始也算起来很简单,就是当前字形起始位置+当前字形所有数据的长度,然后按 8 位对齐,就是下一个字形的起始位置了。在这个例子里面,当前字形数据长度是 23 + 39 = 62 位,然后向上取 8 的整数倍,就是 64 位,要按字节算,就是 8。
整个 A 的字形数据是:
01000001 00001000 101 1000 010110010010110101110001010110100110010C++ 实现#
这个例子除了类之外基本没用 C++ 的其它特性了,所以只会 C 的话,也可以看得懂的!
先根据字体头数据,定义结构体,非常简单。
#include <cstdint>

static uint16_t GetU16Value(const uint8_t* ptr) {
    return ptr[0] << 8 | ptr[1];
}

struct Font {
    uint8_t GlyphCount;        // 字形数量
    uint8_t BoundingBoxMode;   // 边界框模式 0: proportional, 1: common height, 2: monospace, 3: multiple of 8
    uint8_t ZeroBitWidth;      // 表示 0 的位宽
    uint8_t OneBitWidth;       // 表示 1 的位宽
    uint8_t WidthBitWidth;     // 字形宽度位宽
    uint8_t HeightBitWidth;    // 字形高度位宽
    uint8_t XBitWidth;         // 字形 X 偏移位宽
    uint8_t YBitWidth;         // 字形 Y 偏移位宽
    uint8_t DeltaXBitWidth;    // 字形水平间距
    uint8_t BoundingBoxWidth;  // 边界框宽度
    uint8_t BoundingBoxHeight; // 边界框高度
    int8_t BoundingBoxXOffset; // 边界框 X 偏移
    int8_t BoundingBoxYOffset; // 边界框 Y 偏移
    int8_t AscentOfA;          // 字母 A 的上升高度
    int8_t DescentOfG;         // 字母 g 的下降高度
    int8_t AscentOfParen;      // 括号的上升高度
    int8_t DescentOfParen;     // 括号的下降高度
    // 大写字母 A 的起始位置
    [[nodiscard]] uint16_t GetUpperAStartPos() const {
        return GetU16Value(reinterpret_cast<const uint8_t*>(&DescentOfParen + 1));
    }
    // 小写字母 a 的起始位置
    [[nodiscard]] uint16_t GetLowerAStartPos() const {
        return GetU16Value(reinterpret_cast<const uint8_t*>(&DescentOfParen) + 3);
    }
    // Unicode(0x100) 字符的起始位置
    [[nodiscard]] uint16_t GetUnicodeStartPos() const {
        return GetU16Value(reinterpret_cast<const uint8_t*>(&DescentOfParen) + 5);
    }
};
需要特别注意的是,u8g2 的字体数据是大端序的,所以在读取 16 位的数据时,需要将两个字节的数据反转。
将 u8g2_font_wqy.c ↗ 和 u8g2_wqy.h ↗ 复制进项目里面,在这个示例中,我们用 16 像素宽度的文泉驿点阵宋体。
写个打印全部信息的代码看看字体头的数据:
#include <cstdint>
#include <iostream>
#include "u8g2_wqy.h"

struct Font {

    // 省略其它代码

    void PrintFontHeader() const {
        std::cout << "Glyph count: " << +GlyphCount << std::endl;
        std::cout << "BBX mode: " << +BoundingBoxMode << std::endl;
        std::cout << "Bits per 0: " << +ZeroBitWidth << std::endl;
        std::cout << "Bits per 1: " << +OneBitWidth << std::endl;
        std::cout << "Bits per char width: " << +WidthBitWidth << std::endl;
        std::cout << "Bits per char height: " << +HeightBitWidth << std::endl;
        std::cout << "Bits per char X: " << +XBitWidth << std::endl;
        std::cout << "Bits per char Y: " << +YBitWidth << std::endl;
        std::cout << "Bits per delta X: " << +DeltaXBitWidth << std::endl;
        std::cout << "Max char width: " << +BoundingBoxWidth << std::endl;
        std::cout << "Max char height: " << +BoundingBoxHeight << std::endl;
        std::cout << "X offset: " << +BoundingBoxXOffset << std::endl;
        std::cout << "Y offset: " << +BoundingBoxYOffset << std::endl;
        std::cout << "Ascent A: " << +AscentOfA << std::endl;
        std::cout << "Descent g: " << +DescentOfG << std::endl;
        std::cout << "Ascent para: " << +AscentOfParen << std::endl;
        std::cout << "Descent para: " << +DescentOfParen << std::endl;
        std::cout << "Start pos upper A: " << GetUpperAStartPos() << std::endl;
        std::cout << "Start pos lower a: " << GetLowerAStartPos() << std::endl;
        std::cout << "Start pos unicode: " << GetUnicodeStartPos() << std::endl;
    }
};


int main() {
    const auto font = reinterpret_cast<const Font *>(u8g2_font_wqy16_t_gb2312);
    font->PrintFontHeader();
    return 0;
}

// 输出:
// Glyph count: 115
// BBX mode: 0
// Bits per 0: 3
// Bits per 1: 2
// Bits per char width: 5
// Bits per char height: 5
// Bits per char X: 5
// Bits per char Y: 5
// Bits per delta X: 6
// Max char width: 18
// Max char height: 18
// X offset: -2
// Y offset: -4
// Ascent A: 11
// Descent g: -3
// Ascent para: 12
// Descent para: -4
// Start pos upper A: 482
// Start pos lower a: 1026
// Start pos unicode: 1762输出的 Start pos lower a 1026 减去 Start pos upper A 482,就是 ASCII 表里面 'A' 到 'a' 之间 32 个字形数据的长度,一共 544 字节,如果存储 16x16 字形的原始数据的话,需要 16x16/8x32=1024 字节,所以字形数据的压缩效果还是很明显的。
接下来就是要写找到字形数据的类,输入字形数据的编码,返回指向字形数据所在位置的指针。
class GlyphFinder {

    static constexpr uint8_t FONT_HEADER_SIZE = 23;

    const Font *const font_;
    const bool includeLut_;

public:

    GlyphFinder(const Font *font, const bool includeLut) : font_(font), includeLut_(includeLut) {}

    [[nodiscard]] const uint8_t *GetGlyphData(const uint16_t encoding) const {
        const uint8_t *pos = reinterpret_cast<const uint8_t *>(font_) + FONT_HEADER_SIZE;

        if (encoding <= 255) {
            if (encoding >= 'a') {
                pos += font_->GetLowerAStartPos();
            } else if (encoding >= 'A') {
                pos += font_->GetUpperAStartPos();
            }

            for (;;) {
                const uint8_t nextOffset = *(pos + 1);
                if (nextOffset == 0) break;
                if (*pos == encoding) return pos + 2;
                pos += nextOffset;
            }
        } else {
            uint16_t e;
            pos += font_->GetUnicodeStartPos();

            // 没有使用过带查找表的字体去验证这里的代码
            // 所以如果你在这里遇到了问题,可以和我反馈并尝试修改这里
            if (includeLut_) {
                const uint8_t *lut = pos;
                do {
                    pos += GetU16Value(lut);
                    e = GetU16Value(lut + 2);
                    lut += 4;
                } while (e < encoding);
            }

            for (;;) {
                e = GetU16Value(pos);
                if (e == 0) break;
                if (e == encoding) return pos + 3;
                pos += *(pos + 2);
            }
        }

        return nullptr;
    }
};GetGlyphData 函数返回的是字形数据中,指向字形宽度的指针,即跳过了当前编码和到下一个字形的偏移字节,直接就可以开始解析字形数据了。代码比较简单,就不写注释了。为了兼容不带 Unicode 跳转表的字体,增加了 includeLut 参数,如果为 true,则会使用 Unicode 跳转表。文泉驿 u8g2 字体项目 ↗多年无人维护,并不支持 Unicode 跳转表,所以接下来传参时,includeLut 传 false。
我们传一个“文”字试一下:
// 省略其它代码

int main() {
    const auto font = reinterpret_cast<const Font *>(u8g2_font_wqy16_t_gb2312);
    const GlyphFinder finder(font, false);
    const auto gp = finder.GetGlyphData(L"文");
    std::cout << "Glyph pointer: " << reinterpret_cast<const void *>(gp) << std::endl;
    return 0;
}

// 输出:
// Glyph pointer: 0x7ff7a43094b1我是在 64 位 Windows 运行的程序,所以输出的地址长度比单片机的要长一些。
有了字形数据的指针后,就可以写字形数据解析类了,直接开写!
class Glyph {

    const Font *const font_;
    const uint8_t *const glyphPtr_;

    // 字形数据开头有宽高、xy 偏移、水平间距等信息,在这个示例里面,只需要用到宽高信息
    uint8_t bitmapWidth_;
    uint8_t bitmapHeight_;
    int8_t xOffset_;
    int8_t yOffset_;
    int8_t deltaWidth_;

    // 真正的字形数据开始的位置
    uint16_t dataBitStart_ = 0;

    // 在指定位置读指定位数的无符号整数值
    uint8_t ReadValue(uint16_t *bitPos, const uint8_t bitCount) const {
        auto ptr = glyphPtr_ + *bitPos / 8;
        uint8_t bitPosInByte = *bitPos % 8;
        // 字形数据里面的值最大宽度理论上是 256 位,但这并不现实,用 8 位就足够表示了
        uint8_t value = *ptr;

        value >>= bitPosInByte;
        bitPosInByte += bitCount;
        if (bitPosInByte >= 8) {
            uint8_t s = 8;
            s -= *bitPos % 8;
            ++ptr;
            value |= *ptr << s;
        }
        value &= (1U << bitCount) - 1;
        *bitPos += bitCount;
        return value;
    }

    // 在指定位置读指定位数的有符号整数值
    int8_t ReadSignedValue(uint16_t *bitPos, const uint8_t bitCount) const {
        return static_cast<int8_t>(ReadValue(bitPos, bitCount) - (1 << (bitCount - 1)));
    }

public:

    Glyph(const Font *font, const uint8_t *glyphPtr) : font_(font), glyphPtr_(glyphPtr) {
        bitmapWidth_ = ReadValue(&dataBitStart_, font->WidthBitWidth);
        bitmapHeight_ = ReadValue(&dataBitStart_, font->HeightBitWidth);
        xOffset_ = ReadSignedValue(&dataBitStart_, font->XBitWidth);
        yOffset_ = ReadSignedValue(&dataBitStart_, font->YBitWidth);
        deltaWidth_ = ReadSignedValue(&dataBitStart_, font->DeltaXBitWidth);
    }

    // 输出字形数据到控制台
    void PrintGlyph() const {
        // 当前读指针的偏移,按位,因为字形数据不会大于 255 字节,所以这里用可刚好表示最大值
        uint16_t bitOffset = font_->WidthBitWidth + font_->HeightBitWidth + font_->XBitWidth + font_->YBitWidth + font_->DeltaXBitWidth;
        // 当前输出的位置,假设一个字形不会超过 255*255 个像素
        uint8_t x = 0, y = 0;

        // 这个 for 每次循环都读一轮 0 和 1 的位宽,然后读取重复次数,重复次数为 0 时表示结束
        for (;;) {
            const auto zeroCount = ReadValue(&bitOffset, font_->ZeroBitWidth);
            const auto oneCount = ReadValue(&bitOffset, font_->OneBitWidth);
            auto repetitionsCount = 0;
            while (ReadValue(&bitOffset, 1)) {
                ++repetitionsCount;
            }

            if (zeroCount == 0 && oneCount == 0) break;

            // 这个 for 是重复重复次数次
            for (auto i = 0; i <= repetitionsCount; ++i) {
                // 输出 0,用空格表示
                for (auto j = 0; j < zeroCount; ++j) {
                    std::cout << ' ' << ' ';
                    if (++x >= bitmapWidth_) {
                        x = 0;
                        std::cout << std::endl;
                        ++y;
                    }
                }
                // 输出 1,用 M 表示
                for (auto j = 0; j < oneCount; ++j) {
                    std::cout << 'M' << ' ';
                    if (++x >= bitmapWidth_) {
                        x = 0;
                        std::cout << std::endl;
                        ++y;
                    }
                }
            }

            if (y >= bitmapHeight_) break;
        }
    }

};把 main 函数改成这样:
int main() {
    const auto font = reinterpret_cast<const Font *>(u8g2_font_wqy16_t_gb2312);
    font->PrintFontHeader();
    const GlyphFinder finder(font, false);
    const auto gp = finder.GetGlyphData(L"文");
    const Glyph g(font, gp);
    g.PrintGlyph();
    return 0;
}

// 输出:
//             M
//               M
//               M
// M M M M M M M M M M M M M M M
//       M               M
//       M               M
//         M           M
//         M           M
//           M       M
//             M   M
//               M
//             M   M
//           M       M
//         M           M
//     M M               M M
// M M M M完美!再试一下字符串,这里就把全部代码贴上把!
#include <cstdint>
#include <iostream>

#include "u8g2_wqy.h"

static constexpr uint16_t GetU16Value(const uint8_t* ptr) {
    return ptr[0] << 8 | ptr[1];
}

struct Font {
    uint8_t GlyphCount;        // 字形数量
    uint8_t BoundingBoxMode;   // 边界框模式 0: proportional, 1: common height, 2: monospace, 3: multiple of 8
    uint8_t ZeroBitWidth;      // 表示 0 的位宽
    uint8_t OneBitWidth;       // 表示 1 的位宽
    uint8_t WidthBitWidth;     // 字形宽度位宽
    uint8_t HeightBitWidth;    // 字形高度位宽
    uint8_t XBitWidth;         // 字形 X 偏移位宽
    uint8_t YBitWidth;         // 字形 Y 偏移位宽
    uint8_t DeltaXBitWidth;    // 字形水平间距
    uint8_t BoundingBoxWidth;  // 边界框宽度
    uint8_t BoundingBoxHeight; // 边界框高度
    int8_t BoundingBoxXOffset; // 边界框 X 偏移
    int8_t BoundingBoxYOffset; // 边界框 Y 偏移
    int8_t AscentOfA;          // 字母 A 的上升高度
    int8_t DescentOfG;         // 字母 g 的下降高度
    int8_t AscentOfParen;      // 括号的上升高度
    int8_t DescentOfParen;     // 括号的下降高度
    // 大写字母 A 的起始位置
    [[nodiscard]]  uint16_t GetUpperAStartPos() const {
        return GetU16Value(reinterpret_cast<const uint8_t*>(&DescentOfParen + 1));
    }
    // 小写字母 a 的起始位置
    [[nodiscard]] uint16_t GetLowerAStartPos() const {
        return GetU16Value(reinterpret_cast<const uint8_t*>(&DescentOfParen) + 3);
    }
    // Unicode(0x100) 字符的起始位置
    [[nodiscard]] uint16_t GetUnicodeStartPos() const {
        return GetU16Value(reinterpret_cast<const uint8_t*>(&DescentOfParen) + 5);
    }

    void PrintFontHeader() const {
        std::cout << "Glyph count: " << +GlyphCount << std::endl;
        std::cout << "BBX mode: " << +BoundingBoxMode << std::endl;
        std::cout << "Bits per 0: " << +ZeroBitWidth << std::endl;
        std::cout << "Bits per 1: " << +OneBitWidth << std::endl;
        std::cout << "Bits per char width: " << +WidthBitWidth << std::endl;
        std::cout << "Bits per char height: " << +HeightBitWidth << std::endl;
        std::cout << "Bits per char X: " << +XBitWidth << std::endl;
        std::cout << "Bits per char Y: " << +YBitWidth << std::endl;
        std::cout << "Bits per delta X: " << +DeltaXBitWidth << std::endl;
        std::cout << "Max char width: " << +BoundingBoxWidth << std::endl;
        std::cout << "Max char height: " << +BoundingBoxHeight << std::endl;
        std::cout << "X offset: " << +BoundingBoxXOffset << std::endl;
        std::cout << "Y offset: " << +BoundingBoxYOffset << std::endl;
        std::cout << "Ascent A: " << +AscentOfA << std::endl;
        std::cout << "Descent g: " << +DescentOfG << std::endl;
        std::cout << "Ascent para: " << +AscentOfParen << std::endl;
        std::cout << "Descent para: " << +DescentOfParen << std::endl;
        std::cout << "Start pos upper A: " << GetUpperAStartPos() << std::endl;
        std::cout << "Start pos lower a: " << GetLowerAStartPos() << std::endl;
        std::cout << "Start pos unicode: " << GetUnicodeStartPos() << std::endl;
    }
};

class GlyphFinder {

    static constexpr uint8_t FONT_HEADER_SIZE = 23;

    const Font *const font_;
    const bool includeLut_;

public:

    GlyphFinder(const Font *font, const bool includeLut) : font_(font), includeLut_(includeLut) {}

    [[nodiscard]] const uint8_t *GetGlyphData(const uint16_t encoding) const {
        const uint8_t *pos = reinterpret_cast<const uint8_t *>(font_) + FONT_HEADER_SIZE;

        if (encoding <= 255) {
            if (encoding >= 'a') {
                pos += font_->GetLowerAStartPos();
            } else if (encoding >= 'A') {
                pos += font_->GetUpperAStartPos();
            }

            for (;;) {
                const uint8_t nextOffset = *(pos + 1);
                if (nextOffset == 0) break;
                if (*pos == encoding) return pos + 2;
                pos += nextOffset;
            }
        } else {
            uint16_t e;
            pos += font_->GetUnicodeStartPos();

            if (includeLut_) {
                const uint8_t *lut = pos;
                do {
                    pos += GetU16Value(lut);
                    e = GetU16Value(lut + 2);
                    lut += 4;
                } while (e < encoding);
            }

            for (;;) {
                e = GetU16Value(pos);
                if (e == 0) break;
                if (e == encoding) return pos + 3;
                pos += *(pos + 2);
            }
        }

        return nullptr;
    }

    [[nodiscard]] const uint8_t *GetGlyphData(const wchar_t *c) const {
        return GetGlyphData(*c);
    }

};

class Glyph {

    const Font *const font_;
    const uint8_t *const glyphPtr_;

    // 字形数据开头有宽高、xy 偏移、水平间距等信息,在这个示例里面,只需要用到宽高信息
    uint8_t bitmapWidth_;
    uint8_t bitmapHeight_;
    int8_t xOffset_;
    int8_t yOffset_;
    int8_t deltaWidth_;

    // 真正的字形数据开始的位置
    uint16_t dataBitStart_ = 0;

    // 在指定位置读指定位数的无符号整数值
    uint8_t ReadValue(uint16_t *bitPos, const uint8_t bitCount) const {
        auto ptr = glyphPtr_ + *bitPos / 8;
        uint8_t bitPosInByte = *bitPos % 8;
        // 字形数据里面的值最大宽度理论上是 256 位,但这并不现实,用 8 位就足够表示了
        uint8_t value = *ptr;

        value >>= bitPosInByte;
        bitPosInByte += bitCount;
        if (bitPosInByte >= 8) {
            uint8_t s = 8;
            s -= *bitPos % 8;
            ++ptr;
            value |= *ptr << s;
        }
        value &= (1U << bitCount) - 1;
        *bitPos += bitCount;
        return value;
    }

    // 在指定位置读指定位数的有符号整数值
    int8_t ReadSignedValue(uint16_t *bitPos, const uint8_t bitCount) const {
        return static_cast<int8_t>(ReadValue(bitPos, bitCount) - (1 << (bitCount - 1)));
    }

public:

    Glyph(const Font *font, const uint8_t *glyphPtr)
    : font_(font), glyphPtr_(glyphPtr) {
        bitmapWidth_ = ReadValue(&dataBitStart_, font->WidthBitWidth);
        bitmapHeight_ = ReadValue(&dataBitStart_, font->HeightBitWidth);
        xOffset_ = ReadSignedValue(&dataBitStart_, font->XBitWidth);
        yOffset_ = ReadSignedValue(&dataBitStart_, font->YBitWidth);
        deltaWidth_ = ReadSignedValue(&dataBitStart_, font->DeltaXBitWidth);
    }

    // 输出字形数据到控制台
    void PrintGlyph() const {
        // 当前读指针的偏移,按位,因为字形数据不会大于 255 字节,所以这里用可刚好表示最大值
        uint16_t bitOffset = font_->WidthBitWidth + font_->HeightBitWidth + font_->XBitWidth + font_->YBitWidth + font_->DeltaXBitWidth;
        // 当前输出的位置,假设一个字形不会超过 255*255 个像素
        uint8_t x = 0, y = 0;

        // 这个 for 每次循环都读一轮 0 和 1 的位宽,然后读取重复次数,重复次数为 0 时表示结束
        for (;;) {
            const auto zeroCount = ReadValue(&bitOffset, font_->ZeroBitWidth);
            const auto oneCount = ReadValue(&bitOffset, font_->OneBitWidth);
            auto repetitionsCount = 0;
            while (ReadValue(&bitOffset, 1)) {
                ++repetitionsCount;
            }

            if (zeroCount == 0 && oneCount == 0) break;

            // 这个 for 是重复重复次数次
            for (auto i = 0; i <= repetitionsCount; ++i) {
                // 输出 0,用空格表示
                for (auto j = 0; j < zeroCount; ++j) {
                    std::cout << ' ' << ' ';
                    if (++x >= bitmapWidth_) {
                        x = 0;
                        std::cout << std::endl;
                        ++y;
                    }
                }
                // 输出 1,用 M 表示
                for (auto j = 0; j < oneCount; ++j) {
                    std::cout << 'M' << ' ';
                    if (++x >= bitmapWidth_) {
                        x = 0;
                        std::cout << std::endl;
                        ++y;
                    }
                }
            }

            if (y >= bitmapHeight_) break;
        }
    }

};

int main() {
    const auto font = reinterpret_cast<const Font *>(u8g2_font_wqy16_t_gb2312);
    font->PrintFontHeader();
    const GlyphFinder finder(font, false);
    const auto helloWorld = L"你好,世界";
    for (int i = 0; i <= sizeof(helloWorld) / sizeof(*helloWorld); ++i) {
        const auto gp = finder.GetGlyphData(*(helloWorld + i));
        const Glyph g(font, gp);
        g.PrintGlyph();
    }
    return 0;
}

// 输出:
// Glyph count: 115
// BBX mode: 0
// Bits per 0: 3
// Bits per 1: 2
// Bits per char width: 5
// Bits per char height: 5
// Bits per char X: 5
// Bits per char Y: 5
// Bits per delta X: 6
// Max char width: 18
// Max char height: 18
// X offset: -2
// Y offset: -4
// Ascent A: 11
// Descent g: -3
// Ascent para: 12
// Descent para: -4
// Start pos upper A: 482
// Start pos lower a: 1026
// Start pos unicode: 1762
//         M       M
//         M       M
//         M       M
//       M       M M M M M M M M
//       M       M             M
//     M M     M             M
//     M M   M         M
//   M   M             M
// M     M       M     M   M
//       M       M     M     M
//       M     M       M     M
//       M     M       M       M
//       M   M         M       M
//       M             M
//       M         M   M
//       M           M
//       M
//       M         M M M M M M
//       M                   M
//       M                 M
// M M M M M M           M
//     M     M         M
//     M     M         M
//     M     M   M M M M M M M M
//     M     M         M
//   M     M           M
//     M   M           M
//       M             M
//     M   M           M
//   M       M         M
// M         M     M   M
//                   M
// M M
// M M
//   M
// M
//             M       M
//       M     M       M
//       M     M       M
//       M     M       M
//       M     M       M
// M M M M M M M M M M M M M M M
//       M     M       M
//       M     M       M
//       M     M       M
//       M     M       M
//       M     M M M M M
//       M
//       M
//       M
//       M M M M M M M M M M M
//       M M M M M M M M M
//       M       M       M
//       M       M       M
//       M M M M M M M M M
//       M       M       M
//       M       M       M
//       M M M M M M M M M
//             M   M
//         M M       M M
//     M M   M       M   M M
// M M       M       M       M M
//           M       M
//         M         M
//         M         M
// M M到这里,输出字形部部分就完成了!只剩下将字形数据结合偏移、宽度等信息,绘制到输出到屏幕的缓冲区上了!不过都是比较简单的操作,这里就不写了,有兴趣的可以自己尝试一下!
这篇长文章写了花费了比较久的时间来写,错漏在所难免,如果你发现了文章的错误或者有任何问题,都可以邮件联系我,我会尽快回复的!
